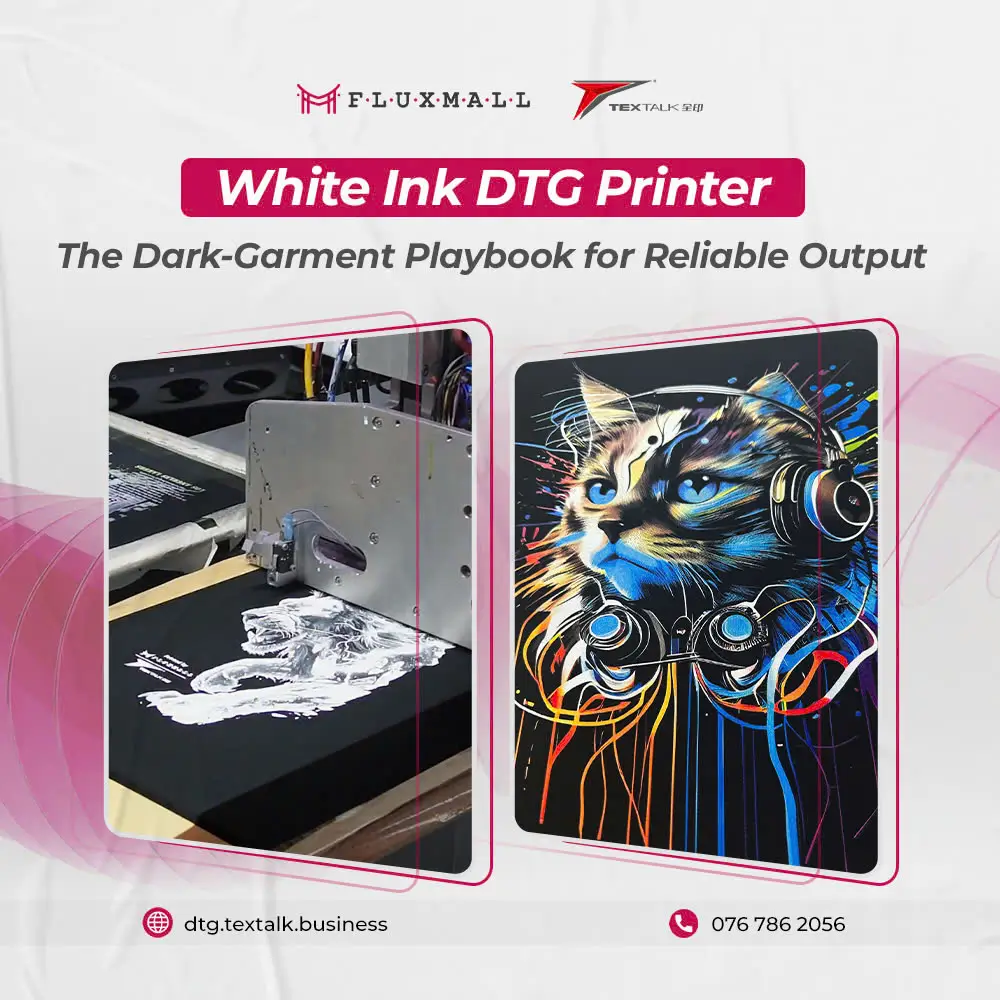
A white ink DTG printer is what makes DTG truly viable for dark garments. CMYK inks look great on light shirts, but on black or navy they’ll sink into the fabric and lose brightness, unless you build a stable white underbase first.
This guide is for shops printing dark garments every day. We’ll cover why white ink matters, underbase basics, how to get clean opacity without losing fine detail, the most common white failures, and the maintenance habits that keep quality consistent instead of some random errors.
Why white ink matters, and why dark shirts expose every weakness
DTG white ink is the “canvas layer” that turns dark fabric into a printable surface. Without it, color looks muted because the garment color shows through.
White ink also magnifies process problems. Small changes in pretreatment, humidity, platen height, or nozzle health show up faster in white than in CMYK. So a shop has prints that is great on light garments can struggle immediately on darks.
If your dark garment prints vary by operator or by day, you should fix the workflow first, like pretreatment phase or the underbase control, rather than fix the artwork file.

White Ink DTG printer for dark shirts: Underbase basics
By all means, a DTG printer for dark shirts is really doing a layered print:
- Pretreat to help white ink sit up and bond consistently.
- White underbase to create opacity and edge control.
- Color layer to deliver the actual image.
The underbase is not only adding more white. It’s a controlled foundation that needs the right thickness and shape. Too thin, and colors look dull. Too heavy, you will lose detail and get a rough, plastic hand feel.
If pretreatment is your weak point, use this as your baseline SOP reference: Fluxmall’s DTG Pretreatment best-practices guide.
White underbase DTG: How to get opacity without halos, blur, or heavy hand feel
White underbase DTG is a feature of this white ink DTG printer. Actually, it is the main point and the base for your printing process, as we already discuss in the last part. And now we go deeper with it. White underbase in DTG is a balance between three outcomes:
- Opacity: how bright the base is.
- Detail: how sharp edges and small text stay.
- Feel: how soft the print remains.
Two settings concepts primarily affect these outcomes are underbase density and edge control. They also matter most in real production.
Underbase “density” (ink amount):
More density increases opacity, but it also increases texture and curing sensitivity. If your details are filling in or your print feels heavy, lower density before changing everything else.
Edge control (choke + highlight logic):
Choke slightly shrinks the underbase so white doesn’t peek out as a halo. Highlight white adds “pop” on top of color but can add thickness fast. Use highlight selectively, don’t blanket the whole design.

For a deeper, operator-friendly explanation of choke/highlight and why halos happen, Fluxmall’s White Underbase Control tutorial is a solid reference.
Printing on black t-shirts: Fast troubleshooting for the most common white problems
Printing on black T-shirts tends to produce the same repeat issues. Even with white ink DTG printer, these issues can still occur. Here are what usually cause them, and the first fix that actually moves the needle.
First is Patchy white or also called “holes” in the underbase. Most often when nozzle dropouts or unstable white flow occur, they are sometimes worsened by uneven pretreatment. You can fix it quickly by checking the nozzle and correcting the cleaning routine. Confirm the pretreatment is even and fully cured before printing.
Second is white halo around the design. Most often when choke is too low or too off. First fix is increasing underbase choke in small steps, then re-testing on fine text and sharp edges.
Third is blurry edges / filled-in details. Most appear when underbase is too heavy or too wet between layers. You can fix it by reducing underbase density first; then considering inter-pass delay if your workflow supports it.
Finally is rough, “plastic” feel. Appear when adding too much total white (base + highlight) and/or over-curing. First fix is reducing white density or limiting highlight coverage. Or verify cure isn’t excessive for the ink stack.
When troubleshooting, change one variable at a time and log it. White problems feel random only when settings and handling are undocumented.
Clog prevention habits For White Ink DTG Printer
White ink maintenance is the price of stable dark printing. White ink DTG printer is more prone to settling and build-up than CMYK, so inconsistent maintenance shows up as banding, weak opacity, and “it worked yesterday” failures.
A production-friendly approach is to treat maintenance like a scheduled station, not a task you squeeze in.
What helps most (without turning your shop into a cleaning marathon):
- Do a consistent nozzle check routine at the same times each shift.
- Keep the capping/wiper areas clean, white residue there becomes quality drift.
- Use appropriate cleaning chemistry, not improvised substitutes, to avoid damaging components or leaving residues.
If you want a practical overview of why proper cleaning fluid saves money in production (less downtime, fewer parts issues), Fluxmall’s article on digital cleaning solutions explains it well.
White ink DTG printer: When CMYK-only works (and when it doesn’t)
CMYK-only DTG can work when the garment is light enough that the fabric acts like a white base. Think white tees, heather light colors, and other high light substrates where CMYK doesn’t need help.
It generally does not work when:
- The shirt is black/navy/deep colors,
- Your design relies on bright, saturated colors,
- You need crisp highlights or readable small text on dark fabric.
A good rule: if the design would look “dim” printed on dark paper without a white layer, it will look dim on a dark shirt without a white underbase.
Next step: Evaluate your dark-print workflow like a production system
If you’re choosing or upgrading a white ink DTG setup, don’t judge it by a single sample. Judge it by repeatability: same opacity, same detail, same hand feel across all shifts.
Two practical moves:
- Test on your top-selling dark blank with your hardest artwork (fine lines + solids + gradients).
- Validate the full chain: pretreat → underbase → color → cure → wash test.
If you’re finding production-class options, Textalk DTG Oval Printer is a good start systems built for volume. For hands-on evaluation, you can contact us now and schedule a Textalk demo through Fluxmall.